
May 27th 2001, Sault Sainte Marie Ontario
- starting Deck Plating
- starting Deck Plating
Having fought the transom, I wanted to ensure we got the alignment right on the hull from the main bulkhead back - that would re-establish confidence that we weren't building a twisted monster - so we laid the aft deck plates as a way to both square the centerline and close the perimeter loop.
 There were lots of contact points to determine alignment - flat across main bulkhead, perimeter against frame edges, 3 long straight longitudinal plate seams, and the final big arc of all plates to the transom.
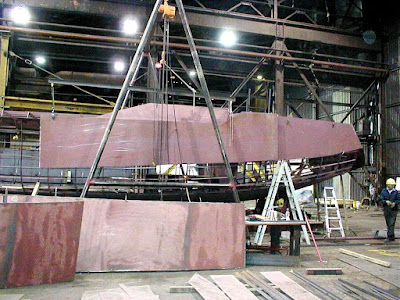
 During this phase, we could not stand up top to manhandle the plates - there wasn't enough rigidity yet. so we had to center our lifting points. Here's a steel eye tacked at the balance point, with a plate clamp on the back edge to allow rope guidance. One good tack can withstand about a ton of steady pull - done along just one edge of a steel eye, a quick whack with a hammer sideways will break off that same tack. Useful whenever a tugging/lifting point was required.
 And here's the proof of our work to date - the back seam pulled up effortlessly, and matched end to end with no grinding, and no gap. Perfect alignment.


The following week we added the fore deck plating - butted up P&S against main bulkhead, pushed sideways against cabin side framing, lined up frame against scribeline - and outer edges were dead on. Tack and keep moving!
 In no time we were at the bow - and the structure stiff enough that Henry was comfortable poising for a shot - while hanging onto the crane.... no trust.
 With the deck plating in place, and the hull starting to line up - and stiffen up - we added the stringers. This was a bit fussy, as they wer all cut to shape, so there was a lot of sorting to do in order to find each stringers' components - we then placed them in the hull loose, wanting to wait till we had the hull plate on before welding. Even now you can see some nice fair hull lines developing

Somewhere in there the pilothouse top & sides fell into place too


More to come
 There were lots of contact points to determine alignment - flat across main bulkhead, perimeter against frame edges, 3 long straight longitudinal plate seams, and the final big arc of all plates to the transom.
  During this phase, we could not stand up top to manhandle the plates - there wasn't enough rigidity yet. so we had to center our lifting points. Here's a steel eye tacked at the balance point, with a plate clamp on the back edge to allow rope guidance. One good tack can withstand about a ton of steady pull - done along just one edge of a steel eye, a quick whack with a hammer sideways will break off that same tack. Useful whenever a tugging/lifting point was required.
 And here's the proof of our work to date - the back seam pulled up effortlessly, and matched end to end with no grinding, and no gap. Perfect alignment.
Back to sassy!


Somewhere in there the pilothouse top & sides fell into place too
First Hull Plate - June 21st 2001

Had to start somewhere - felt the most comfortable starting at the back and working forward. The deck plate was a little wavy/flexible still, so we developed the technique of ling up the hull plate (including in this case pulling it into the frames with our big clamps) getting one top corner lined up & tacked - then lining up the next tack 4-6" further down - and if the deck seam was fair - zap - and move on - otherwise, we'd go up/down on the A-frame crane till the deck seam was good - and then zap - move on. Could get into a good rhythm with one welder and a craneman. Deck came out looking great.
 Didn't show it before, but we were prepping all plate prior to placing - grinding bevels to inside (and we learned to place the plates scribemark side in - really helps with frame alignment)


here we are hoisting a longer midship plate - note the use of a spreader; it kept the longer plate ends from flopping around, providing a more stable lift.
again, we'd start by lining up the top aft corner, and work our way forward, tying into the deck using the reference scribe line (accuracy was awesome)

bow plates were just more of the same, though more of a curve - long plates.again, we'd start by lining up the top aft corner, and work our way forward, tying into the deck using the reference scribe line (accuracy was awesome)


And after 50 ft, when we finally get to the bow and pull everything together, it's bang on.
Note no nose cone - that detail started after this version (this is hull #2 ofthe V495 series!)
More to come
No comments:
Post a Comment